Google Cloud HTTPs load balancing with Letsencrypt certificate
To setup HTTPs load balancer on Google Cloud Platform , we need to create an SSL certificate beforehand. Letsencrypt can be used to create an SSL certificate free of cost. The SSL certificate provided by Letsencrypt is valid for 3 months. In this article, we will learn how to setup HTTPs load balancing using Letsencrypt certificate for a Ruby on Rails application on Google Cloud Platform.
1. Create a Letsencrypt certificate
To create a Letsencrypt certificate, the prerequisites are listed below.
- A domain name.
- Access to the application on the domain name.
The process of creating an SSL certificate requires the commands to be run either on the server for which an SSL certificate is being installed or we need an access to the application that is deployed on the domain for which SSL certificate is being requested for.
Google Cloud Load Balancer gives us an IP address and we actually do not have a separate application to use to run commands required for generating a Letsencrypt certificate.
Certbot
Certbot is a utility used to create the certificate. Certbot can be installed on MAC OS X using brew package manager with the command given below.
1) Install certbot
brew install certbotOnce certbot is installed, run the command below to initiate
certificate generation request.
2) Run certificate generation request
sudo certbot certonly --manual -d www.example.comReplace www.example.com with the name of your domain.
It will guide you through the process
and
it will ask for some inputs such as email, organization name, city
etc.
The email will be used to send an alert regarding
the domain expiration notices.
3) Verify the domain
Certbot will try to verify the domain by giving you a unique URL and it will expect a unique response to make sure the domain is owned by you.
For example, it will ask for
.well-known/acme-challenge/VMAd1o01ZxsEN9o77z4vuQGwGPG6_HB3aFsrtHyDZBoAnd it will expect
VMAd1o01ZxsEN9o77z4vuQGwGPG6_HB3aFsrtHyDZBo.xiOXpNgH57i4iI1D7ATqjbGrkfPbcszZwbnGqP4N4pk
in response.
If you are working with a Ruby on Rails application, this can be achieved quickly just with the Rails routes.
You can just add a route as given below,
get ".well-known/acme-challenge/VMAd1o01ZxsEN9o77z4vuQGwGPG6_HB3aFsrtHyDZBo", to: proc { [200, {}, ['VMAd1o01ZxsEN9o77z4vuQGwGPG6_HB3aFsrtHyDZBo.xiOXpNgH57i4iI1D7ATqjbGrkfPbcszZwbnGqP4N4pk']] }4) Certificate generated
At the end of the process you will have an access to following files.
- fullchain.pem
- cert.pem
- chain.pem
- private.pem
These files would be used in the next steps while configuring SSL certificate resources on Google Cloud Platform’s console.
2. Configure on Google Cloud Console
Head to the Google Cloud Load Balancer option on Cloud Console. If you are not familiar with configuring Google Cloud Load Balancer, please take a moment to go through video given below.
Once you have a load balancer resource ready, you can use it to create HTTPs access to it by creating a new certificate.
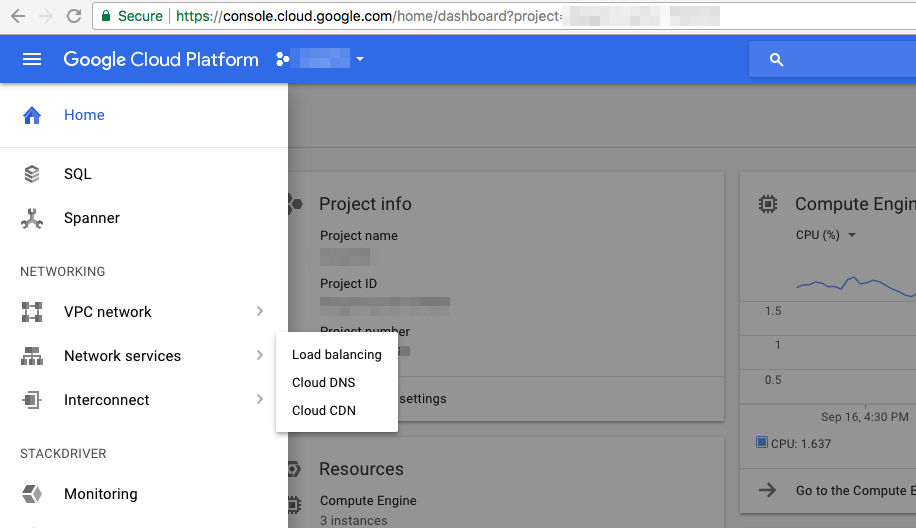
1) Move to Load Balancer
Console > Network Services > Load Balancing
Move to load balancer page on Google cloud console as shown in the snapshot given below.
2) Select a load balancer
Assuming you were able to create a load balancer after going through video given above, select a load balancer from the list on which you need to install the SSL certificate.
Open the edit page for the load balancer. It would look something like a snapshot given below.
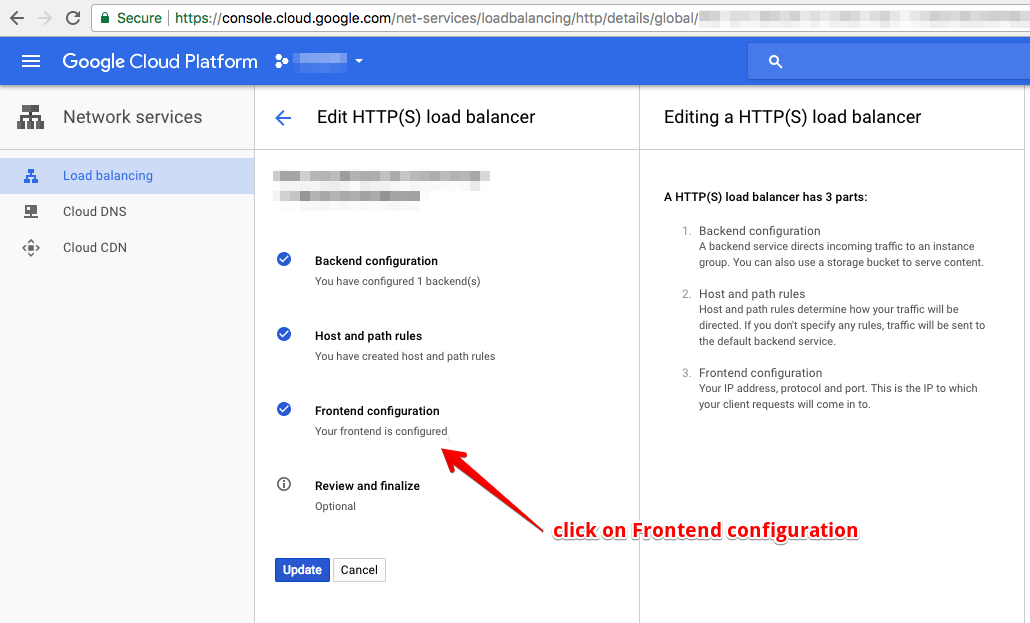
3) Create an SSL certificate resource
In Frontend configuration section, click on Add Frontend IP and port. Enter the details for the fields requested as given below.
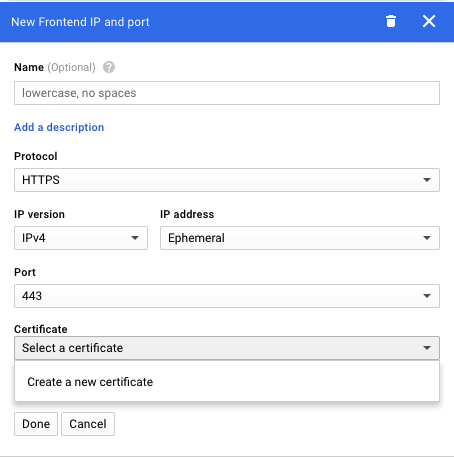
- Name: Lowercase, no spaces.
- Protocol: Select HTTPS from the dropdown.
- IP version: Select IPv4 from the dropdown.
- IP address: Select IP address or keep
Ephemeraloption. - Port: 443 (comes default when you select protocol to be HTTPS)
- Certificate: Dropdown is displayed when you select protocol to be HTTPS
In the certificate dropdown, select Create a new certificate option.
It will present a dialog as shown below.
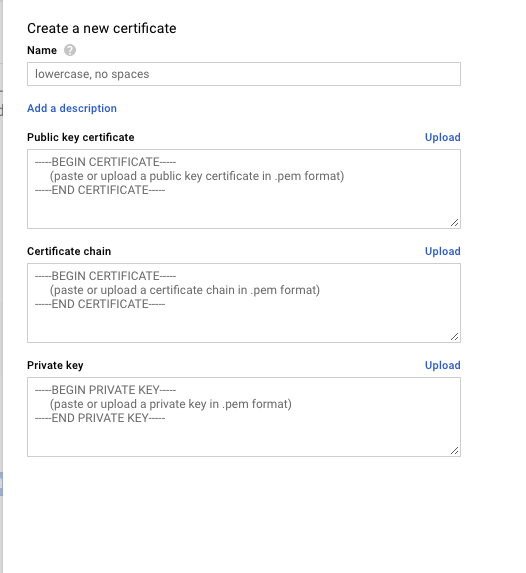
Input values from the Step 1 obtained in these inputs.
- Name: Name for the SSL certificate resource
- Public key certificate: Content from the
cert.pemfile - Certificate chain: Content from the
chain.pemfile - Private key: Content from the file
private.pemfile
Hit Create button, it will validate
and
create an SSL certificate resource.
Update the Load Balancer configuration.
It will 5 to 10 minutes come to an effect.
Verify the HTTPS access to your site works by entering an IP address in the browser.
Subscribe to Ruby in Rails
Get the latest posts delivered right to your inbox

